Fundus photography involves several technical aspects to capture high-quality images of the back of the eye. Here are the key technical details involved in fundus photography:
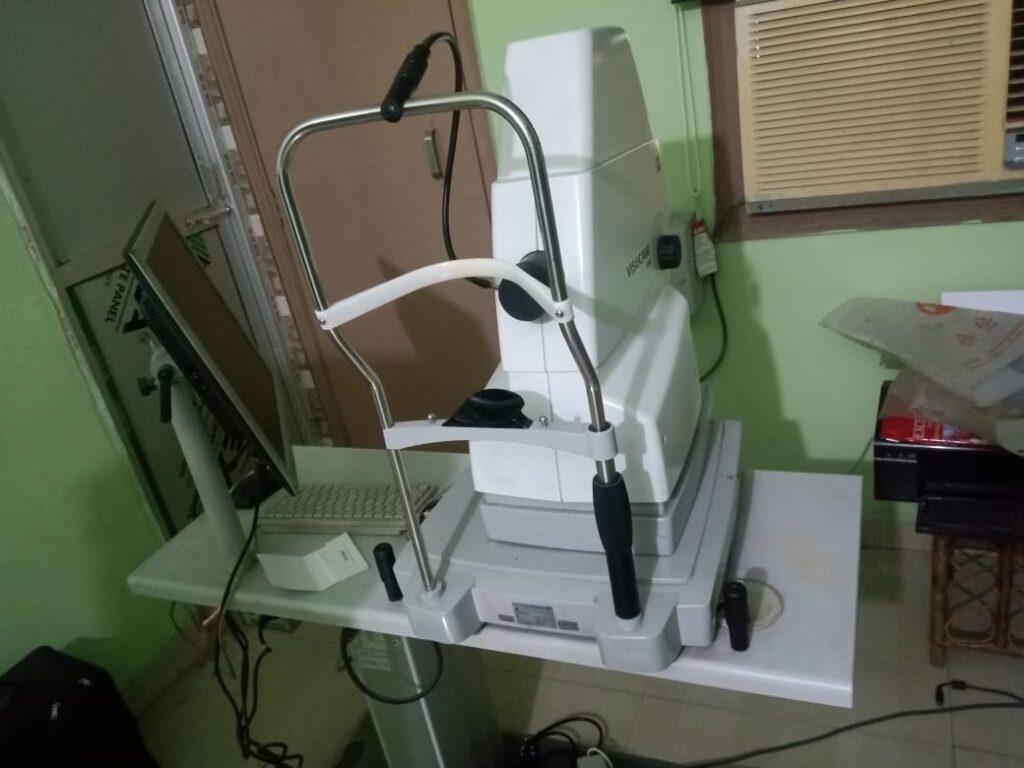
- Camera Type:
- Fundus cameras are specialized devices designed specifically for capturing images of the retina and other structures in the back of the eye. They are equipped with high-resolution digital sensors.
- Optical Components:
- Fundus cameras contain a series of lenses and mirrors that help focus and direct light onto the retina. These optical components ensure that the image is sharp and clear.
- Light Source:
- A bright, short-duration flash is used to illuminate the fundus. This flash is typically in the blue-green spectrum, as it is well-absorbed by the retina and minimizes discomfort for the patient.
- Dilation and Pupil Size:
- Dilation of the patient’s pupils is often performed using eye drops. This enlarges the pupil, allowing for a wider view of the fundus. A larger pupil size also helps to reduce the effects of diffraction, which can affect image quality.
- Field of View:
- Fundus cameras offer a range of field of view options, from standard to wide-angle. Wide-angle systems can capture a larger portion of the retina, providing a more comprehensive view.
- Image Sensor Resolution:
- The digital sensor within the fundus camera plays a crucial role in determining the image resolution. Higher resolution sensors produce more detailed images with finer anatomical features.
- Color Reproduction:
- Fundus cameras are designed to accurately reproduce colors within the retina. This is important for identifying abnormalities such as hemorrhages, lesions, and pigment changes.
- Auto-Focus and Alignment:
- Fundus cameras often have auto-focus capabilities to ensure that the image is clear and in focus. They may also have alignment guides to help position the camera correctly in relation to the patient’s eye.
- Capture Modes:
- Fundus cameras may offer various capture modes, including single-image capture or multiple-image sequences. Multiple images at different angles can be taken to provide a comprehensive view of the fundus.
- Image Storage and Transfer:
- Images are typically saved digitally in a standard format (such as JPEG or DICOM) for easy storage and retrieval. They can be transferred to a computer for further analysis and documentation.
- Image Processing and Enhancement:
- Some fundus cameras may have built-in image processing features to enhance the quality of the captured images. This can include adjustments for brightness, contrast, and color balance.
- Integration with Imaging Systems:
- Fundus cameras are often part of larger ophthalmic imaging systems that may include other modalities like optical coherence tomography (OCT) or angiography. These integrated systems allow for a comprehensive assessment of the eye.
Description of the fundus photography test:
- Preparation:
- Before the test, your eyes may be dilated using eye drops to enlarge the pupils. This allows for a better view of the structures in the back of the eye. It’s important to note that dilation can cause temporary sensitivity to light and blurry vision, so it’s advisable to bring sunglasses and have someone accompany you.
- Instrumentation:
- Fundus photography uses a specialized camera called a fundus camera or retinal camera. This camera is equipped with a high-resolution digital sensor and various optical components designed to capture clear images of the fundus.
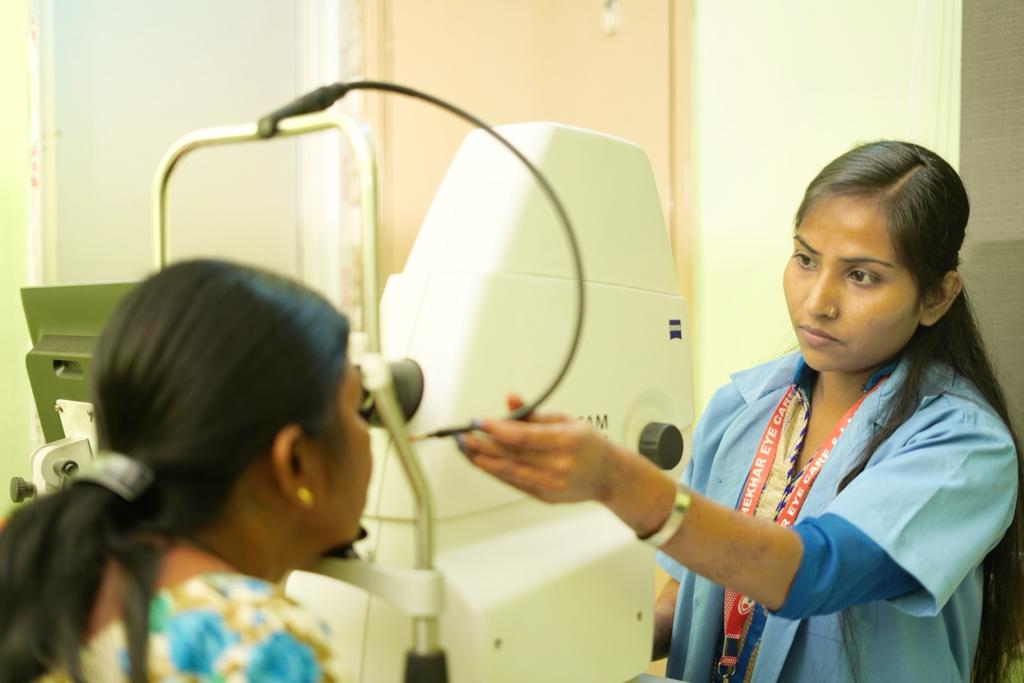
- Patient Positioning:
- You will be seated comfortably, and your chin and forehead will be positioned against a rest to stabilize your head. This minimizes movement during the procedure, ensuring sharp images.
- Focusing and Alignment:
- The technician or ophthalmologist will align the camera with your eye, adjusting the focus and position to obtain the best possible view of the fundus.
- Image Capture:
- Once properly aligned, the camera emits a brief flash of light as it takes the photograph. This flash is bright and can be momentarily startling, but it’s necessary for capturing clear images.
- Image Sequence:
- Multiple images may be taken at different angles to provide a comprehensive view of the fundus. This allows the healthcare provider to assess different areas of the retina.
- Documentation:
- The captured images are saved digitally for further analysis. They may be labeled with patient information, date, and other relevant details for proper documentation and tracking.
- Post-Procedure:
- After the test, your vision may remain blurry for a few hours due to the dilation drops. Wearing sunglasses and having someone to accompany you can help with sensitivity to light.
- Analysis and Diagnosis:
- The captured fundus images are then examined by an ophthalmologist or optometrist. They look for any abnormalities, such as signs of disease, bleeding, swelling, or changes in the blood vessels.
- Follow-up and Treatment:
- Based on the results of the fundus photography, your healthcare provider will determine if further tests or treatments are necessary. This may include additional imaging, laser therapy, medication, or surgery, depending on the condition detected.
Fundus photography is a valuable tool in ophthalmology as it provides a non-invasive, detailed view of the structures at the back of the eye, aiding in the diagnosis and management of various eye disorders.
Fundus Fluorescein Angiography (FFA) is a diagnostic procedure used in ophthalmology to evaluate the blood flow in the retina and choroid, the vascular layers at the back of the eye. It involves the use of a specialized camera and a fluorescent dye to capture detailed images of the blood vessels in the eye.
- Preparation:
- Before the procedure, the patient’s eyes may be dilated using eye drops to ensure a clear view of the retina. The patient is informed about the procedure, including potential side effects and what to expect.
- Fluorescent Dye Injection:
- A water-soluble dye called fluorescein is injected into a vein, usually in the arm. The dye quickly circulates through the bloodstream and reaches the blood vessels of the eye within a few seconds.
- Camera and Filters:
- The patient is seated in front of a specialized fundus camera equipped with specific filters. The filters are designed to capture light emitted by the fluorescein dye, which fluoresces or emits a greenish-yellow light when exposed to a certain wavelength of blue light.
- Image Sequence:
- The procedure involves taking a series of rapid photographs at different time intervals after the injection of the dye. These images capture the movement of the dye through the blood vessels and provide information about blood flow and any abnormalities.
- Early Phase (Arterial Phase):
- The first set of images, taken within seconds to a minute after injection, show the rapid filling of the retinal arteries and initial transit through the retinal vasculature.
- Intermediate Phase:
- Images taken a few minutes after injection reveal the progression of the dye as it continues to flow through the smaller vessels of the retina and choroid.
- Late Phase (Venous Phase):
- Images taken several minutes after injection provide information about the venous return and any areas of delayed or abnormal blood flow. These images are particularly useful for detecting leakage or pooling of the dye.
- Recording and Documentation:
- The images are digitally recorded and labeled with relevant patient information, date, and time. They serve as a visual record of the blood flow patterns in the eye.
- Post-Procedure:
- After the procedure, the patient may experience temporary side effects such as a yellowish tint to vision or a metallic taste due to the presence of the dye in the bloodstream. These effects subside as the dye is metabolized and excreted by the body.
- Analysis and Diagnosis:
- The images are analyzed by an ophthalmologist, who looks for any abnormalities in blood flow, such as blockages, leaks, or abnormal vessel patterns. These findings aid in diagnosing and managing various retinal and choroidal conditions, including diabetic retinopathy, macular degeneration, and vascular occlusions.
Fundus Fluorescein Angiography is a valuable tool in ophthalmology that provides crucial information about the blood flow in the retina and choroid. It aids in the diagnosis and management of various vascular and retinal disorders, allowing for timely intervention and treatment.
Top of Form